Month: April 2021

Toilet Paper

Like a knife, toilet paper (henceforth known as TP) is the ultimate in personal choice — it’s optional for some which is why it’s last on the list 🙂

Pick a brand and stick with it.  I like something more commercial that does not have a tube in the middle, but some folks like the inner tube for “thumb-rolling” action.  My preference packs more TP in less space.

Recently, I’ve found a fantastic option to save on space in the backpack.  Canadian Prepper has a great youtube video on TP tabs.  You do need to bring a little bit of water with you in your water bottle, but having used this option, I can attest to being squeaky clean of those evil Klingons that turn into dark matter around the black hole.

If TP tabs are just too gleamingly ingenious and newfangled for you, and you prefer traditional TP, then Wirecutter has done a great article on the best toilet paper to pamper your privates.

Knife

The Knife.  An honorable mention.  The knife makes it onto my Baker’s Dozen list because everyone includes it in their lists too.

A knife is a very personal choice.  Either folding or fixed-blades work. Doug Ritter’s site has an excellent article discussing how to choose a survival knife.

I am by no means a knife expert, but trolling though blogs and reviews has pointed me to these popular brands in no specific order: TOPS, Mora, Condor, Benchmade, Spyderco, Camillus, and Ontario Knife Company (OKC) , just to name a few that provide reasonably priced, excellent quality knives.  The Mora and Condor knives are the most value-priced in this list.  The great survivalist (from Dual Survival TV show fame) Cody Lundin has carried a wood-handled Mora for decades, and Surviorman (Les Stroud) works with Camillus and Helle of Norway, while Doug Ritter partnered with Benchmade to model his own knife design — based of course, off an existing popular Benchmade knife.

Currently I am proud to be carrying the Condor Kephart for my camping trips, pictured above.  I’m partial to Condor because of their price point.  I think its the best bang for the buck.  I have no relationship with them, and get no benefits from them.  Starting in 2018, I’m also carrying a blue plain-edge  Benchmade 535 Bugout as a neck knife, since it is so light-weight.  It is a surprisingly sharp and useful folder.  Very happy with it.

Condor Tool & Knife make very competitively priced knives in El Salvador.  What drew me to the Kephart knife was that it had a wooden handle with a rounded pommel (no sharp corners to poke holes in my backpack), a slightly longer 4.5″ blade that was just a bit thicker and more robust than a kitchen chef’s knife, and a gently curved finger guard.  For my personal tastes, I also liked the weight and balance of the knife and I prefer the drop point blade profile, which has a good “belly” for all the slicing that I do when preparing the steaks and veggies to be grilled on the campfire.  I also have the Condor Bushlore (large version) that I use for other purposes, and would consider the Condor Mayflower if it came in a 4″ version.

If this was my first blade, I would suggest a non-folder, with full tang, and at least a 3.5″ to 4.25″ blade.  It will remind you of a basic kitchen knife which everyone is comfortable using.  In fact, there is nothing preventing you from going to Target or Walmart, and getting a regular kitchen paring knife if you don’t want to spend $40+ on a heavier duty camping knife.  Two additional recommendations are the Benchmade 15006 (2020 version) or 15008 (pre-2020) Steep Country, and the Kershaw Camp 5, both of which are great slicers.

Survival knifes usually boast a very thick blade, so they can withstand being pommeled to split wood, but I don’t agree with this use.  You can always split wood by driving a wooden wedge into a log, and saving your knife blade for better uses.  That is why I ALWAYS carry an axe when camping.

Jay Fisher has written the definitive article on the anatomy of a knife, you are interested in reading more about how a knife is put together and the various terms.

Whistle

This article is more about communication than a whistle.

You can carry around a mirror, or even a flare gun if you want, but most children don’t really know how to use these unless they’ve been trained.  An adult can figure out how to use a mirror or other signalling tool through trial and error, but if you’re with kids that are under 12, then chances are they can use their lungs better than their brains.

I always consider the lowest common denominator when I go camping, in terms of safety and knowledge.  Everyone needs to be able to use a signal device in case of emergency.  I’ve come to the remarkable conclusion — as many others have in their brilliant wisdom — that whistles are great emergency communication devices and happen to be very portable, cheap and come in lots of different colors.

The international call for distress on land would be 3 blasts from a whistle.

There are so many brands and types of whistles:  pea-less, loudest, compact, titanium, pink…you name it.

What I have found from testing about 40 different types of whistles with my kids, is that the best whistles — ones that everyone clearly recognize — are actually classic pea-based sporting event whistles, even though the pea is touted as a failing point.

Unless you submerge a really cheap pea-based whistle underwater for hours on end, the pea (usually made of cork and specially treated for moisture resistance to withstand all the water-rich air your lungs produce), will actually not deteriorate, expand, jam, or fail.  Some peas are synthetic, so they can only possibly jam, but the engineers have put some thought into preventing events like that from happening.

Pea-less sound is the key selling feature of brands like FOX40, Molten, and others.  Don’t get me wrong:  Pea-less whistles have no moving parts so they are indestructible, but there is something about the lower-pitch and dual-tone clarity of a pea-based whistle that you can’t miss when you hear it.

FOX40 has always been my go-to brand of whistle as they are readily available throughout North America, but recently I’ve switched over to the very popular ACME Thunderer (Model 60.5) which does contain a pea.  Mine includes a rubber bite-guard (aka. whistle tip guard) which is also useful for winter whistle use, especially on metal whistles.  The Thunderer whistle is top quality and has been made in England since 1884.

FOX40 has an equivalent pea-based whistle called the Super Force, used by the NHL and comes with its own patented mouth grip.

Most whistles are designed to produce loud recognizable sound between 95 dB and 120 dB.  The tone varies quite a bit, with most pea-less whistles registering higher pitch sounds, while pea-based whistles typically have lower, richer trill tone.  For example both the Thunderer and Super Force are quite loud at 110-115 dB when blown at full force and can clearly be heard in a packed arena of cheering fans.  In general, most whistles blown at full force can be noticeably heard at best, up to about a 2km or roughly over a mile away in a clear field or open space, but your mileage may vary in the woods.  In reality, expect to be heard only up to about 1/3 of that distance, or around to 800m (1/2 mile) in heavily obstructed areas.

The enormous Storm whistle boasts to be the loudest whistle in the world, and as demonstrated by my kids, I can attest it really is — ringing in at 120+ dB.  The Storm is also the largest whistle we tested, and is designed for marine use (it works under water and can be heard for about 50 feet in that medium).  I’ve included a generic decibel chart below for comparison.  The loudness is measured from about a foot away (except for the jet engine).

Basic First-Aid Kit

Adventure Medical makes some excellent kits, but any first aid kit will do.  I personally carry the 0.5lb version with a few pain killers and Imodium AD tablets thrown in.  I also add some 6″ scissors and water purifying tablets to my kit.

Regarding painkillers, I’ve done a bit of research, and my brand of choice is Advil, over Tylenol, Asprin or Motrin.  Drugs in general are not the best treatment, but if push-comes-to-shove, ibuprofen-based Advil appears to be a better pain management drug for inflammation and general pain from breaks, sprains, impalements, cuts, burns and other camping related pain inducing activities.  It will also cover discomfort from headaches, but usually lots of fresh clean potable water is a much better solution to a headache than a drug.  Chances are you are dehydrated.  In fact, you may want to check the quality of that bottled water.  Anything over 230ppm in dissolved solids will make your kidneys work overtime, and thus would make you continue to feel thirsty.  Bottled water (in Canada) must have this number published somewhere on the label. The best low-cost bottled water readily available in most supermarkets in Canada is Eska, with only 80ppm dissolved minerals and salts.

Given that I carry an axe, I’ve also invested in an Israel bandage for hemorrhagic wounds like a traumatic axe accident to the foot, leg or arm.  A blood clotting agent like CELOX was also added to the first-aid kit last year to stop any severe bleeding, fast — including those nasty zombie bites….

Tongs

Do yourself a favor, and bring a pair of all-metal stainless steel tongs with you when you go camping.  Any plastic or silicon grip add-ons to the tongs will only get in the way, and could possibly melt around the campfire, add unnecessary weight, and make cleaning the tongs more difficult.

A 14″ to 16″ pair keeps your hands well away from the fire, lets you flip food like a pro, and allows you to quickly adjust the coals in the fire-pit (baked potatoes anyone?)

I recommend self locking tongs (as pictured) that have been stamped out of a heavier duty gauge steel.   Sometimes you get lucky and the locking mechanism contains a hole in it so you can hang them off a nail.  The dollar store ones are typically too flimsy.  Cheap ones lock with a sliding square ring, that will eventually slip off and get lost.

You will inevitably use the tongs as a poking stick to re-arrange the logs on the campfire, so don’t cheap out on this tool as it needs to be sturdy enough to handle everything you want to pick up.

Fire Starter

ALWAYS bring at least 2 ways to start a fire.  Remember the saying: TWO IS ONE, AND ONE IS NONE.

I always carry 3 options:  a disposable mini BIC lighter, the best 1/2″ round Firesteel and scraper money can buy (which will last forever), and stormproof matches — as pictured above.

I’ve hardly ever used the matches during camping (I have 22 left in my match case) and have lit most of my fires over the years with either the firesteel or lighter.

Practically speaking, matches are a last resort given all the other modern-day options we have today, but you might as well carry them too since they are so light-weight.  If you insist on bringing matches, then just spend the money on a 25-pack of UCO Stormproof matches and be done with it.  You will get 25 fires out of it.  These matches are really incredible.  They will stay lit for a full 15 seconds: plenty of time to start a fire.  They even continue to burn if you submerge one that’s lit, completely under water.  It will automatically re-light itself.  I’ve never had a stormproof match fail to start a properly built fire bundle — but they do require the special striker that comes with the matches — don’t loose that.

Make sure you PRACTICE OUTSIDE before using any of your fire starters in camp.  Lighting a fire outdoors is actually not that easy, due to wind and moisture.  I’ve posted a quick video on Youtube which shows how simple — and at the same time, difficult — it is to build and light a decent campfire.

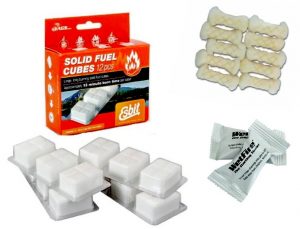
Its always good to bring 8-12 cotton balls lightly smeared in Vaseline/petroleum jelly (also available as pre-packaged tinder quik tabs), or some other pre-packaged starter fuel.  I’ve also experimented with a slice of indestructible rubber bicycle inner-tube, which works incredibly well since it is bulletproof even when soaking wet.  The rubber requires at least 5-7 seconds of high heat from a continuous flame (a lighter) to combust.

A more expensive option is to carry a fuel tab like Wetfire or an Esbit stove tab.  They burn for well over 3-5 minutes and allow you to establish a good coal-base in more discouraging camping conditions.

Headlamp

There are primarily two mass-market brands that dominate the LED headlamp market in the big-box camping stores (REI, MEC, MooseJaw.com, Backcountry.com, Amazon, etc):  Petzl and Black Diamond, although any brand of headlamp will outlast you, unless you really abuse your equipment.  I have a Tikka XP from 1992, that is still going strong.  The three key areas where headlamps have improved in recent years, beyond the typical weight reduction attempts, are:

1) dimming technologies (that improve battery life), and advances in

2) LED brightness, along with

3) weather/water-resistance


MARCH 2017: I’ve also started considering the Fenix brand of headlamps as they are offered in 1 x AA and 2 x AAA form factors — using fewer batteries and weight less.

Of course, the primary purpose behind a headlamp is to free up your hands.  Pretty much all the mass-market headlamps now use 3 x AAA batteries.  The newest craze is USB-rechargeable (but that assumes you now bring a USB charger or a folding solar charger PLUS the cable with you — for longer trips).

Instead, I prefer to stick with readily replaceable batteries.  I use the very convenient Store-A-Cell battery holder/carrier/caddy by PowerPax and simply bring spares.  The 6 x AAA glow-in-the dark version is what I carry for all my camping trips.  Recently they’ve introduced a 4 x AAA version if you don’t need to carry as many batteries.  You should try to standardize on AA or AAA size batteries for all your electronics.

I’ve been partial to the Zipka Plus over the years, because it is so light weight, and by using the re-tractable head strap, you can strap it to your wrist.  Recently, I’ve switched to the Black Diamond SPOT headlamp (shown in the featured picture above), simply because the newer LED in the SPOT is much brighter than my Zipka Plus (from 2007).  The SPOT also has a red LED for night vision, is very simple to operate, even with gloves on.  It is currently the best rated headlamp on the market for the under $40 price-point.

MAY 2019:  In my foray of looking for the best headlamp, I believe I’ve come across the best priced solution for my purposes — the single AA powered ThruNite TH20 (in neutral white), for under $30USD/$40CAD.  I absolutely love this headlamp compared to all previous headlamps I’ve owned primarily because it runs on a single AA battery in an unbreakable aircraft-grade machined aluminum shell, and is super-simple to operate.  The headlamp is easily removable from the head strap to become a flashlight and has a very nice big on/off button that controls an “infinite” brightness adjustment (moonlight=0.5lumens to 250 lumens in turbo mode) which produces an excellent flood/beam pattern for camping purposes.  The headlamp uses a well designed reflector with a 2014-engineered Cree XP-L (V6) diode. The headlamp comes with replaceable o-rings and is waterproof to 2 meters.  If you want more brightness, you can swap the AA battery for a 14500 750mA Li-ion rechargeable battery to produce up to a 520 lumen blast of light in turbo mode, so you can see that 1/2 mile ahead of you on your midnight walk down the trail, blind other campers across the lake, or send SOS signals to the moon.  It does not have a red LED for night vision, but I’ve always found this option under-used during camping, unless you are star-gazing.  I do have the small Nite Ize Moonlit LED Micro Swivel Lantern in Red, that I use inside my hammock or tent, if I need red light.

Practically speaking, at a campsite you only really need about 25-30 lumens (think 30 birthday candles worth) of brightness to do most tasks — like washing up, reading in a tent, and visiting the thunderbox during the night.  So any of today’s  headlamps (or flashlights) are over-kill in terms of the brightness you need.  This means any light you choose will last a very very long time (upwards of almost 2 weeks on a fresh set of batteries) if you operate the flashlight on the more practical lower brightness settings.  Too much light is harsh on your eyes during the evening, and is annoying as heck to everyone else you decide to face head on.  By using only a single AA battery to power your primary light needs, you’ve reduced the need to carry so many spare batteries, and you know that you cannot mix up a used battery with a new one.  Just remember to unscrew the cap by 1/4 turn when you pack the TH20 away in your pack, so the push button doesn’t accidentally get turned on.


JAN 2019:  On the topic of lighting — I was on a camping trip recently where there was a fire ban, so we used a general purpose lantern to mimic a campfire at night.

I’ve used my fair-share of lanterns over of the years, and by far the best lantern I’ve used to date which impressed me and I now recommend to everyone, is the $20 Goal Zero Crush Light Solar Powered Lantern (available from pretty much any outdoor retailer, or Amazon).  Not only is it compact (about 6″ in diameter) and solar/USB rechargeable, but it has a flicker mode that emulates a candle (and in this case a campfire).  Its even sufficiently waterproof to be used upside down as an emergency bowl if you forgot yours, or need a spare at the site.


But by far the biggest selling feature for me was the quality of light.  Unlike many LED lanterns out there that produce a cheap and harsh blue-tinged light, this Goal Zero product uses a very nice LED that is yellow tinged, like an incandescent light bulb, which is easier on the eyes in the evening.   Expect a solid 4-5 hours of light in medium mode, and more than 10+ hours in low mode — more than enough for the evening.  Also, the lantern crushes down or or folds flat to a very portable form factor when packing up, and can be recharged from a Portable Power Bank over-night, if necessary.  Keep in mind that you only need about 5 lumens of light (low power mode on most flashlights/headlamps/lanterns) to see sufficiently in a 10 foot radius, when performing tasks.  At 5 lumens, all lighting devices running on a battery will last at least 10 to 12 hours to get you through the night.

In general, you want to pack two forms of light in a bugout bag; one for general purpose AREA lighting, and another  that you can carry with you and is localized to the task you are performing.

Spoon

Just like a metal bowl, you actually only need one eating utensil.

The spoon.  It can pick up bite-sized solid food like a fork, eat soups and cereals, and can cut like a knife (in a bind).  Why carry three separate utensils when one can do it all without the sharp edges of a spork?  Plus, you are most likely already carrying a proper full tang fixed blade knife or folder, so the extra cutlery is not really necessary.

My preference is a shorter handled spoon, over a long-handle, because it is easier to pack.

The best cutlery set, that I’ve found is a titanium set from Titaner, although I really only use the spoon.  The simplicity of the set is perfect.  There are no fancy holes CNC’d out of the handles to weaken or lighten the utensils.

I found this particular set to be made out of a thicker titanium sheet that makes it feel closer to regular cutlery, but the shapes are downsized and proportioned just right.  It is not like the typical “stamped” super-thin titanium cutlery that litters ebay and outdoor stores.  The utensils do weight a little bit more, at 13g/0.46oz each.  All three pieces in the set are exactly the same length (154mm/6″ ) which is beneficial when packing them.  The picture above shows the spoon from this set.

APRIL 2021:  it appears Titaner has discountinued this cutlery set, but Amazon carries hundreds of other titanium or plastic cutlery sets for camping purposes.

If you want a very heavy-duty spoon, then consider the USMC issued spoons from the 1960’s, available on eBay.  They are military grade, and very solid.

Metal Bowl

I’ve been camping with just a simple metal bowl and no plate, for the past 20+ years.  The 800ml/27 fl.oz MSR Alpine Bowl is the the best all-around stainless steel bowl, and the bonus is that it stacks super efficiently.  It also fits perfectly in your hand.

You can go fancy with titanium, but the weight difference is minimal for this piece of equipment.

Steel is easy to wash, BPA-free, can be put into the fire or on top of the grill, and ALL foods will fit into a bowl.  You can also use a glove to hold and insulate the bowl if it is too hot.

A small pot is a good substitute, but a bowl generally has lower sides and rounder edges than a pot, which makes eating out of it more comfortable.

An 8″ folding handle skillet (also known as a “frying pan” with slanted sides) — from GSI Outdoors or Sea to Summit — also works well, just like the old cowboy movies showed ’em cowboys eatin’ beans.  (I carry the GSI Pinnacle 8″ pan as part of my cook set – the coating makes for easy  cleanup).

For those who want a very solid (but light weight) stainless steel option, and not worry about scratches, the 8″ Pathfinder pan is outstanding in terms of build quality and price, and comes with a lid.  Remember, you can make a stainless steel pot or pan “non-stick” by seasoning it with oil, similar to how you would season a cast iron pan.  This makes camping cleanup that much easier.

Saw

I started bringing a saw camping about 18 years ago.  It was the right thing to do.  In fact, for a while I thought about giving up the axe completely, but now both the axe and saw are best friends, and always get packed together.

Back in the day, I started with the excellent Trail Blazer Bucksaw — a 100% Canadian made foldable 24″ saw (also available as an 18″ model).  My preference has always been for a longer saw, so a full stroke can be taken on a log as large as 14″ to 16″ in diameter.  Unfortunately, Trailblazer has gone bankrupt.

Since 2015, I’ve switched to THE BEST CAMPING SAW on the market from Japanese manufacturer, Silky Saws.  I currently carry the  Silky KATANABOY, 500mm/19.5″ ( XL Teeth ).  I’ve cut through dead fall as large as 18″ in diameter with this saw, with no problems.  Due to popular demand, and because SIZE matters, Silky released an even larger Katanaboy with a 650mm/25.5″ blade.  This largest sized Silky basically cuts as fast as a chainsaw in softwoods, but is probably overkill for folks who stick to collecting manageable sized firewood.  Not to be outdone, there is now even a Katanaboy 1000.

For practical camping purposes, Silky has a variety of elite folding pruning saws (which only cut on the pull stroke), and they are all simply amazing.  The Bigboy 2000 (XL Teeth) with a 360mm/14″ curved blade (yellow handled pictured above) would be my next best recommendation, and is less expensive (under $70), but does not offer quite the same two-handed comfort during long wood cutting sessions of a full-sized Katanaboy (like 10+minutes of cutting through a 12″ diameter deadfall).  Regardless of the saw you get, stick with XL or Large tooth size for a faster, more aggressive cut.  For camping, the cut is utilitarian and does not need to be precise or have a cabinet makers clean finish, which is why I recommend the largest possible saw tooth geometry.

A curved blade cuts faster than a straight blade since it kicks out the wood chips a little more effectively.  When cutting near the ground, a curved blade helps to not get dirt stuck in the saw teeth, and saves your back a bit.  The two hidden advantages of a folding saw over a bucksaw that I discovered first hand in the field, are: that you can cut right through large diameter timber without hitting the top edge of the saw frame on the log, which means you can cut right through the log without needing to physically rotate or re-position it.  This issue plagues both the bucksaw and its non-collapsible cousin: the bow saw.  The second advantage is your hand positioning.  With a bucksaw your knuckles can come into contact with the log on each stroke (see  leather gloves).  With the overhand grip of a folding saw, your hands are much better protected since they are nowhere near the bark of the log.  Also from a comfort level, it appears to be more ergonomic to hold a saw handle horizontally, rather than vertically.

The reason for the switch from the bucksaw to a Silky folder for me was really two-fold:  Although the Trailblazer bucksaw cuts in both directions, it has a very thin kerf (blade thickness), and when sawing vigorously, would sometimes bind and flex/bend.  This happened more frequently when sawing with two people on both ends of the saw.  A Silky saw has a slightly thicker kerf, so it does not bend so easily, although you still need to be careful.  Silky blade teeth are also impulse hardened and stay super-sharp for a long time.  The blade itself is actually taper ground — thicker at the tooth edge and thinner at the top edge of the blade, which reduces binding significantly.  These premium blade features alone, are worth paying the premium cost of a Silky, compared to other brands of pruning saws.  My second reason was that the setup time is much easier and faster with a folding pruning saw.  You have to assemble and disassemble a bucksaw from multiple pieces.  A Silky folding saw is only slightly longer than a compact bucksaw and they both weight about the same within an ounce or two.

For those on a budget, I can highly recommend a one-piece non-folding curved professional-grade pruning saw from Corona, available from Lowes.  I used the 18″ Corona RS-7500 series RAZORTOOTH for about 5 years before finally spending the money on the slightly lighter and more efficient Katanaboy.  I found Silky saws cut a bit faster through both hardwoods and softwoods, but you cannot go wrong with the Corona, especially when cutting any of the spruce/pine/fir (SPF) species.  The Corona is a bullet-proof camping saw for cutting up firewood, with a strong thick kerfed blade and a very comfortable wooden handle (now upgraded to a polymer handle on the RS-7510D model).  The blade is made in South Korea, so it excellent quality.  I just wish it came with a scabbard, but you can always re-enforce the cardboard safety cover that ships with the saw, with packing tape or duct tape.